Friday 18 February 2011

Layers -Blending Modes


This is a simple blending mode to show how you can adjust colour slightly. I simply made a new layer, selected the colour I wanted and chose layer - new fill layer - solid colour. I then changed the blending mode to colour and changed the opacity to make the colour blended further. The tone of the image is retained then and an interesting effect is achieved. 
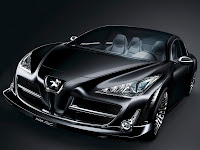


The next example is a blending mode to create texture. On the texture layer I changed the blending mode to darken and then added a layer mask. Then I removed the texture around the outside of the car so it was as if it was only applied onto the car.  


Layer Mask

 The man and the trees were dragged onto the cloud image. They were re-ordered with the trees at the top, and clouds at the bottom with their opacity turned down. The man was the layer that needed to be cut out from so the layer mask was added onto his layer by clicking the  layer mask button located at the bottom of the right hand side layers panel (the same symbol for the quick mask). I then painted over the man, making sure the black square was at the front, and he reappeared on the top as if brought forward to the top layer. Remembering if you draw too much then you can always just bring the white square forward and paint over the areas that have been selected in error, then the background appears to come forward. When doing that though, you need to be clicked on the actual layer mask square on the layer, not just the layer. To the right is the final image.


We then used the layer mask to smooth out a woman's wrinkles. I first duplicated the layer and then added a Guassian blur of about 1.5 radius, which adds a soft blue to the whole photo. I then added a layer mask and painted over the areas that need to be crisp like the eyes, hair, mouth, remembering to keep the black square at the front! For areas's such as they eyes, it's useful to bring the opacity down because then the effect is softer and looks more blended. Obviously all of her wrinkles have not been removed, you would then have to use the heal tool or the patch tool afterwards, but it's s start, and is an example of using a layer mask for another scenario.

Original                                                                                        Layer Mask Edit


With this layer mask the pigeon needed to look as if it was in motion and the background remains crisp. I first duplicated the layer, added a motion blur to the new layer, and then a layer mask. Making sure my black square was in the foreground i then painted onto everything surrounding the pigeon brining the background back clear again, and the pigeon being the only part with the motion blur filter visible. Just another example of the uses of as layer mask.


Layers- Smart Filters


A smart filter is useful compared to just applying a filter, because it adds a separate layer and allows you to go back and change it at any point, obviously as long as you save it as a photoshop file. You can also then change the filter to any other one instead of having to remove a present filter and start again. 
In this example, the wall was selected using the quick selection tool and then filters - convert for smart filters and a motion blur filter was chosen. The filter was then changed in direction so that the blur was then vertical for a different effect.


Horizontal motion blur

 
Vertical motion blue

Layers - Smart Object

Sometimes when you free transform a photo smaller, then decide you want to make it a bit bigger or even return it to its original size, on stretching it back you notice the image then becomes blurred which can be incredibly annoying. The smart object tool allows you to avoid this. Found under layer - smart object - convert to smart object this tool keeps the image information intact so that if you decide to extremely change the size, you will always be able to get back to your original sized image, and it be as clear as it once was. Below are 2 examples, the photograph free transformed without smart object applied, and with. the difference is definitely noticeable and this tool is very useful. 


Layers - Scrapbook

This exercise was again to use layers in different orders, but this time there were layer styles and text added. The photo was added into the other set of layers and the white border of it was removed. The paper texture layer had the opacity turned down and blending changed from normal to luminosity. The photo and the letter layers were then linked together, or merged, free transformed smaller and moved down the page. 'Scrapbook'was added in century gothic font style, 72 pt. with the layer style of bevel and emboss - inner bevel, depth 50%, drop shawdow, pale orangey shade. the other text layer was then changed from being hidden and edited to a '3'. The letter and photo layer were then given a drop shadow, 50% opacity, size 10px. And the image was complete. A good tool to remember when doing effects with layers is if you hold Alt and click onto where it says effect on the layer you have applied the effect to, you can then drag the effect onto another layer, or all of them.

Layers - Salad

This was an exercise to show that we can create new layers and move them around inside an image. We had to individually put all the different elements onto their own layers, name them accordingly, and place all the food onto the chopping board.

  
Original
Final Layer Edit

Layers - Introduction

Our introduction to layers consisted of the basic movement of layers, naming of layers, and placement of the layer objects. We got the original images below and had to move them so that Micky appeared behind the car. This mean we had to use a selection tool - i used the magic wand - to select the background then invert it and copy that to a new layer. Then Micky could be placed behind the new layer. We then had to free transform the hat so that it was i proportion with Micky ass if he was wearing it. I removed the background because you couldn't see Micky's ears.


This is the final result below...

Monday 14 February 2011

Final Techniques All Together

Contrast, colour balance & unsharp mask

match colour with other portrait

______________________________________

 
contrast, colour balance & unsharp mask

 
then colour matched with other portrait 
_______________________________________

  
contrast, colour balance & unsharp mask

 
colour matched with other landscape
_____________________________________ 
 
contrast, colour balance & unsharp mask 


colour matched with other landscape


Filters

Photo (Colour) Filter 

 
original

cooling filter

__________________________________________________

General Filter


You can add more than one filter to an image by clicking the box at the bottom of the filter gallery next to the bin. Effectively this adds another layer and they can be swapped around in different orders.

Original


 Note Paper Filter
__________________________________________________

Dust & Scratches Filter


This filter helps primarily with images that are from film camera, that you have scanned into photoshop. You should be able to remove the majority of the dust on the image and the scratches with this very handy tool. As a general rule the threshold, if higher, will change the images less, and if lower, will change the image more.

______________________________________

Render - Lighting Effects

 
Style -RGB lights 


Style - Five lights down  
______________________________________

Unsharp Mask


 Radius 
0.2 (Always keep low)
Lower radius - sharpens edge pixels. 
Higher  radius - sharpens all around and can create a crazy effect.

Amount 
500%

Theshold 
the higher it is, the less it will do

Black & White


black & white

______________


black & white edit

__________

  
soft black & white edit

   
tint
____________________


black & white with sepia tint